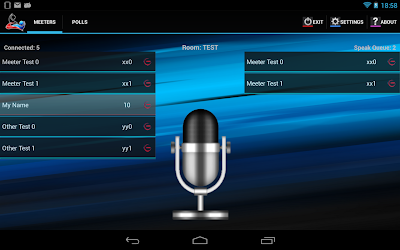
This Android application allows you to manage a conference meeting and it is composed by two modules:
MeetRoom Manager (server):
for collecting the participants, assigning the talking precedence and proposing polls for voting
https://play.google.com/store/apps/details?id=com.ms.meetmanager
MeetRoom (client):
for talking to other people via the built-in microphone and voting in polls proposed by the supervisor.
https://play.google.com/store/apps/details?id=com.ms.meetroom
The server application should be installed on a main device (generally an Android tablet) and connected to the hall's audio system. A single server can manage several devices (phones or tablets with MeetRoom app client installed) connected to the same wi-fi access point.
MeetRoom Manager handles connection requests from clients and creates an interactive meeting room system. The first action to set-up the meeting room is to assign a Conference Room Name in the server setting panel:
Other people can join the conference through the MeetRoom client only if they know the room name.
For the connection, the meeters have to insert their name or nickname and, if required, also the seat number.
When the connection is established for a client device, the name of the meeter is added to the "Connectect" list on the server device "Meeters" panel and kept highlighted for about one minute.
Microphone function
[Note: when a meeter disconnects its device, the name will be removed from both the Connected and Speak Queue lists]
On the client app, the microphone blinks to indicate that the name is included in the speak list until the supervisor enables the user for speaking, by a long click over its name in the Speak Queue.
In that case, the user receives an audio notification and the color of blinking microphone becomes red; when he is ready to talk, he can click over the blinking icon to turn on the device physical microphone. The user's voice is captured by the client local mic and transmitted to the server and (generally) forwarded to the hall's audio system.
At any time, the supervisor can suspend temporarily the speaker and intervene directly using the server microphone function (with a simple click over the mic icon).
The supervisor can also switch on another user in the Speak Queue (with a long click) or permanently interrupt the talker user by clicking the minus red icon on the right of the name.
In order to avoid audio issues when the server microphone is too near to the audio speakers, a parameterizable acoustic echo canceller is implemented inside this app. You can adjust the microphone gain the sound card latency and the speaker volume in the setting panel:
Poll Voting function
The supervisor can prepare polls or questions with choices and store them in the server database.The "Add New Poll" button on the bottom of the "Polls" panel opens a popup form where it is possible to assign a short name for the new poll, the question to submit to the meeters and a set of possible choices.
The poll's argument may be reused several times in different contexts; for this reason, you need to define an event each time you want propose the same poll to a specific audience.
The "blind" flag on the event definition determines if the ballot is secret or not; in other terms if the user choices are stored or not in the database or if only the final results are computed.
If an poll event is not yet voted all the connected users are added to the "Voting" list. At this point, the superuser may decide to remove some person from that list (by clicking the red minus icon)
or start the voting process (by clicking the "Start Voting" button)
The poll question and choices are deployed to all user present in the "Voting" list so that each participant involved in the poll can make its choice and send it back to the server.
After the user has sent the vote, his name is removed from the "Voting" list; the supervisor can close the voting process (by clicking the "Stop Voting" button) even though there are still persons who have not cast their votes.
The server app collects all votes and at the end of voting process the results are shown on client devices.
Charting function
The voting results are stored inside the server local database and it is possible to consults them at a later time; select the poll name and then select the event to get the "Voters" list:
In case of not secret ballots the user choices are explicit, but in any case you can analyze the aggregate results and create attractive charts based on them.
You can define the 3D depth ( value=0 for flat charts ); hide the count values and/or the percentages; collect the labels in a legend or distribute them over the chart image:
Moreover you can set random colors for pie-slices and bars or use the previous caught ones (the button "Catch Colors" should be used to save the current color set).
The "No Voting" options allows you to include or exclude the abstained users in the final counting.


